2 posts tagged with "oidc"

View All Tags

Secured NiFi cluster with NiFiKop with external dns on the Google Cloud Platform

Alexandre Guitton

Alexandre Guitton

Alexandre Guitton

Objectives

This article is pretty similar to the Secured NiFi cluster with NiFiKop on the Google Cloud Platform one.

This time, we will also use NiFiKop and Terraform to quickly :

  • deploy a GKE cluster to host our NiFi cluster,
  • deploy a cert-manager issuer as a convenient way to generate TLS certificates,
  • deploy a zookeeper instance to manage cluster coordination and state across the cluster,
  • deploy X secured NiFi instances in cluster mode
  • configure NiFi to use OpenId connect for authentication
  • configure HTTPS loadbalancer with Client Ip affinity to access the NiFi cluster
  • dynamically re-size the cluster

We will :

Pre-requisites

  • You have your own domain (you can create one with Google) : it will be used to map a domain on the NiFi's web interface. In this post, we will use : trycatchlearn.fr.

Disclaimer

This article can get you started for a production deployment, but should not used as so. There are still some steps needed such as Zookeeper, GKE configuration etc.

Create OAuth Credentials

First step is to create the OAuth Credential :

  • Go to your GCP project, and in the left bar : APIs & Services > Credentials
  • Click on CREATE CREDENTIALS : OAuth client ID
  • Select Web Application
  • Give a name such as SecuredNifi.
  • For Authorised JavaScript origins, use your own domain. I'm using : https://nifi.orange.trycatchlearn.fr:8443
  • For Authorised redirect URIs it's your previous URI + /nifi-api/access/oidc/callback, for me : https://nifi.orange.trycatchlearn.fr:8443/nifi-api/access/oidc/callback
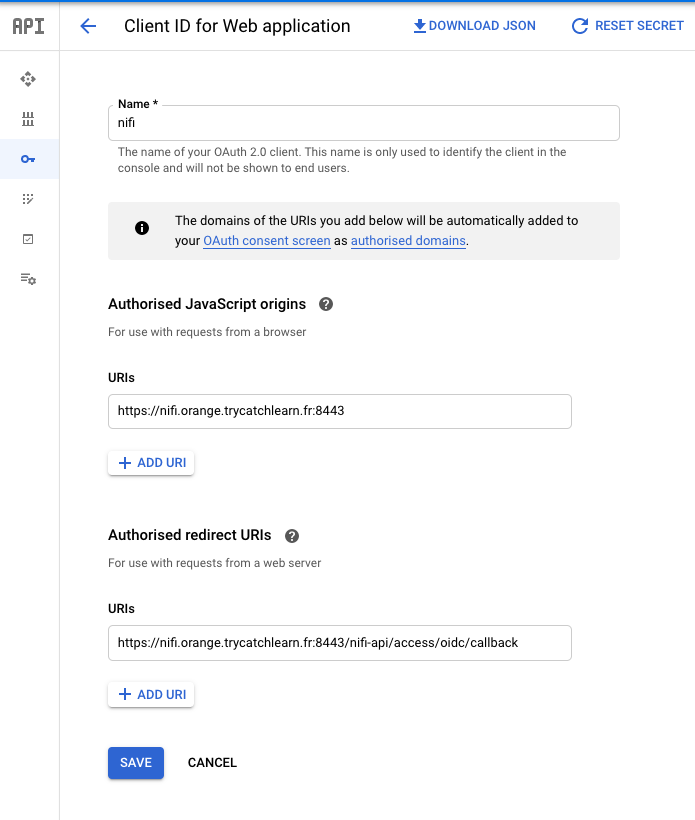
OAuth credentials

  • Create the OAuth credentials

Once the credentials are created, you will get a client ID and a client secret that you will need in NifiCluster definition.

Create service account

For the GKE cluster deployment you need a service account with Editor role, and Kubernetes Engine Admin.

Deploy secured cluster

Once you have completed the above prerequisites, deploying you NiFi cluster will only take three steps and few minutes.

Open your Google Cloud Console in your GCP project and run :

git clone https://github.com/Orange-OpenSource/nifikop/nifikop.git
cd nifikop/docs/tutorials/secured_nifi_cluster_on_gcp_with_external_dns

Deploy GKE cluster with Terraform

Deployment

You can configure variables before running the deployment in the file terraform/env/demo.tfvars :

  • project : GCP project ID
  • region : GCP region
  • zone : GCP zone
  • cluster_machines_types : defines the machine type for GKE cluster nodes
  • min_node : minimum number of nodes in the NodePool. Must be >=0 and <= max_node_count.
  • max_node : maximum number of nodes in the NodePool. Must be >= min_node_count.
  • initial_node_count : the number of nodes to create in this cluster's default node pool.
  • preemptible : true/false using preemptibles nodes.
cd terraform
./start.sh <service account key's path>

This operation could take 15 minutes (time to the GKE cluster and its nodes to setup)

Once the deployment is ready load the GKE configuration :

gcloud container clusters get-credentials nifi-cluster --zone <configured gcp zone> --project <GCP project's id>

Explanations

The first step is to deploy a GKE cluster, with the required configuration, you can for example check the nodes configuration :

kubectl get nodes
NAME STATUS ROLES AGE VERSION
gke-nifi-cluster-tracking-ptf20200520-a1aec8fe-2dl3 Ready <none> 110m v1.15.9-gke.24
gke-nifi-cluster-tracking-ptf20200520-a1aec8fe-5bzb Ready <none> 110m v1.15.9-gke.24
gke-nifi-cluster-tracking-ptf20200520-a1aec8fe-5t3l Ready <none> 110m v1.15.9-gke.24
gke-nifi-cluster-tracking-ptf20200520-a1aec8fe-w86j Ready <none> 110m v1.15.9-gke.24

Once the cluster is deployed, we created all the required namespaces :

kubectl get namespaces
NAME STATUS AGE
cert-manager Active 16m
default Active 27m
kube-node-lease Active 27m
kube-public Active 27m
kube-system Active 27m
nifikop Active 16m
zookeeper Active 16m

In the cert-manager namespace we deployed a cert-manager stack in a cluster-wide scope, which will be responsible for all the certificates generation.

note

in this post, we will let let's encrypt act as certificate authority. For more informations check documentation page

kubectl -n cert-manager get pods
NAME READY STATUS RESTARTS AGE
cert-manager-55fff7f85f-74nf5 1/1 Running 0 72m
cert-manager-cainjector-54c4796c5d-mfbbx 1/1 Running 0 72m
cert-manager-webhook-77ccf5c8b4-m6ws4 1/1 Running 2 72m

It will also deploy the Zookeeper cluster based on the bitnami helm chart :

kubectl -n zookeeper get pods
NAME READY STATUS RESTARTS AGE
zookeeper-0 1/1 Running 0 74m
zookeeper-1 1/1 Running 0 74m
zookeeper-2 1/1 Running 0 74m

And finally it deploys the NiFiKop operator which is ready to create NiFi clusters :

kubectl -n nifikop get pods
NAME READY STATUS RESTARTS AGE
external-dns-5d588c6cd6-dw44f 1/1 Running 0 2m58s

Deploy NiFiKop

Now we have to deploy the NiFiKop operator :

Deploy the NiFiKop crds :

kubectl apply -f https://raw.githubusercontent.com/Orange-OpenSource/nifikop/master/deploy/crds/nifi.orange.com_nificlusters_crd.yaml
kubectl apply -f https://raw.githubusercontent.com/Orange-OpenSource/nifikop/master/deploy/crds/nifi.orange.com_nifiusers_crd.yaml
helm repo add orange-incubator https://orange-kubernetes-charts-incubator.storage.googleapis.com/
helm repo update
# You have to create the namespace before executing following command
helm install nifikop \
--namespace=nifikop \
--set image.tag=v0.2.1-release \
orange-incubator/nifikop

Deploy Let's encrypt issuer

As mentioned at the start of the article, we want to delegate the certificate authority to Let's Encrypt, so to do this with cert-manager we have to create an issuer. So edit the kubernetes/nifi/letsencryptissuer.yaml and set it with your own values :

apiVersion: cert-manager.io/v1alpha2
kind: Issuer
metadata:
name: letsencrypt-staging
spec:
acme:
# You must replace this email address with your own.
# Let's Encrypt will use this to contact you about expiring
# certificates, and issues related to your account.
email: <your email>
server: https://acme-staging-v02.api.letsencrypt.org/directory
privateKeySecretRef:
# Secret resource used to store the account's private key.
name: example-issuer-account-key
# Add a single challenge solver, HTTP01 using nginx
solvers:
- http01:
ingress:
ingressTemplate:
metadata:
annotations:
"external-dns.alpha.kubernetes.io/ttl": "5"

You just have to change the Spec.Acme.Email field with your own email. You can also change the acme server to prod one https://acme-v02.api.letsencrypt.org/directory

Once the configuration is ok, you can deploy the Issuer :

cd ..
kubectl create -f kubernetes/nifi/letsencryptissuer.yaml

Deploy Secured NiFi cluster

You will now deploy your secured cluster to do so edit the kubernetes/nifi/secured_nifi_cluster.yaml and set with your own values :

apiVersion: nifi.orange.com/v1alpha1
kind: NifiCluster
metadata:
name: securednificluster
namespace: nifi
spec:
...
initialAdminUser: <your google account email>
readOnlyConfig:
# NifiProperties configuration that will be applied to the node.
nifiProperties:
webProxyHosts:
- <nifi's hostname>:8443
# Additionnals nifi.properties configuration that will override the one produced based
# on template and configurations.
overrideConfigs: |
...
nifi.security.user.oidc.client.id=<oidc client's id>
nifi.security.user.oidc.client.secret=<oidc client's secret>
...
...
...
listenersConfig:
useExternalDNS: true
clusterDomain: <nifi's domain name>
sslSecrets:
tlsSecretName: "test-nifikop"
create: true
issuerRef:
name: letsencrypt-staging
kind: Issuer
  • Spec.InitialAdminUser : Your GCP account email (this will give you the admin role into the NiFi cluster), in my case alexandre.guitton@orange.com
  • Spec.ReadOnlyConfig.NifiProperties.WebProxyHosts[0] : The web hostname configured in the Oauth section, in my case nifi.orange.trycatchlearn.fr
  • Spec.ReadOnlyConfig.NifiProperties.OverrideConfigs : you have to set the following properties :
    • nifi.security.user.oidc.client.id : OAuth Client ID
    • nifi.security.user.oidc.client.secret : OAuth Client secret
  • Spec.ListenersConfig.ClusterDomain : This the domain name you configure into your External DNS and Cloud DNS zone. In my case orange.trycatchlearn.fr

Once the configuration is ok, you can deploy the NifiCluster :

kubectl create -f kubernetes/nifi/secured_nifi_cluster.yaml

The first time can take some time, the cert-manager and Let's encrypt will check that you are able to manage the dns zone, so if you check the pods :

kubectl get pods -n nifikop
NAME READY STATUS RESTARTS AGE
cm-acme-http-solver-4fg5b 1/1 Running 0 18s
cm-acme-http-solver-6sw9x 1/1 Running 0 20s
cm-acme-http-solver-bpzvm 1/1 Running 0 20s
cm-acme-http-solver-f8xvs 1/1 Running 0 19s
cm-acme-http-solver-k997c 1/1 Running 0 17s
cm-acme-http-solver-l5fzz 1/1 Running 0 18s
external-dns-569bf79b57-hjmtt 1/1 Running 0 9h
nifikop-56cb587d96-p8vdf 1/1 Running 0 29s

And check the ingresses :

kubectl get ingresses -n nifikop
NAME HOSTS ADDRESS PORTS AGE
cm-acme-http-solver-4pff9 nifi-2-node.nifi-headless.orange.trycatchlearn.fr 80 2m27s
cm-acme-http-solver-cfsf4 nifi-0-node.nifi-headless.orange.trycatchlearn.fr 34.120.24.109 80 2m30s
cm-acme-http-solver-hn8jj nifi-controller.nifikop.mgt.orange.trycatchlearn.fr 34.120.90.24 80 2m29s
cm-acme-http-solver-llhsp nifi-1-node.nifi-headless.orange.trycatchlearn.fr 80 2m27s
cm-acme-http-solver-v8dmm nifi-headless.orange.trycatchlearn.fr 34.120.201.215 80 2m28s
cm-acme-http-solver-xvs9f nifi.orange.trycatchlearn.fr 35.244.202.176 80 2m27s

You can see some ngnix instances that are used to validate all the dns names you required into your certificates (for nodes and services).

After some times your cluster should be running :

kubectl get pods -n nifikop
NAME READY STATUS RESTARTS AGE
external-dns-569bf79b57-hjmtt 1/1 Running 0 9h
nifi-0-nodekmhgz 1/1 Running 0 27m
nifi-1-node4465q 1/1 Running 0 27m
nifi-2-node5jwwx 1/1 Running 0 27m
nifikop-56cb587d96-p8vdf 1/1 Running 0 40m

Access to your secured NiFi Cluster

You can now access the NiFi cluster using the loadbalancer service hostname <nifi's cluster name>.<DNS name>, in my case it's https://nifi.orange.trycatchlearn.fr:8443/nifi and authenticate on the cluster using the admin account email address configured in the NifiCluster resource.

Here is my 3-nodes secured NiFi cluster up and running :

3 nodes cluster

3-nodes secured NiFi cluster :

3 nodes

You can now update the authorizations and add additional users/groups.

note

Just have a look on documentation's page to finish cleaning setup. And you can now start to play with scaling, following the documentation's page

Cleaning

Start to remove you NiFi cluster and NiFiKop operator :

kubectl delete nificlusters.nifi.orange.com nifi -n nifikop
helm del nifikop
kubectl delete crds nificlusters.nifi.orange.com
kubectl delete crds nifiusers.nifi.orange.com
kubectl delete issuers.cert-manager.io letsencrypt-staging -n nifikop

To destroy all resources you created, you just need to run :
cd terraform
./destroy.sh <service account key's path>

Secured NiFi cluster with NiFiKop on the Google Cloud Platform

Alexandre Guitton

Alexandre Guitton

Alexandre Guitton

Credits

Before starting, I wanted to mention the fact that this post is an adaptation of the Pierre Villard's one : Secured NiFi cluster with Terraform on the Google Cloud Platform

Objectives

In this article, we'll use NiFiKop and Terraform to quickly :

  • deploy a GKE cluster to host our NiFi cluster,
  • deploy a cert-manager issuer as a convenient way to generate TLS certificates,
  • deploy a zookeeper instance to manage cluster coordination and state across the cluster,
  • deploy X secured NiFi instances in cluster mode
  • configure NiFi to use OpenId connect for authentication
  • configure HTTPS loadbalancer with Client Ip affinity to access to the NiFi cluster
  • re-size the cluster dynamically

Pre-requisites

  • You have your own domain (you can create on with Google) : it will be used to map a domain to the NiFi's web interface. In this post, we will use : trycatchlearn.fr.

Disclaimer

This article can get you started for a production deployment, but should not used as so. There is still some steps needed such as Zookeeper configuration etc.

Create OAuth Credentials

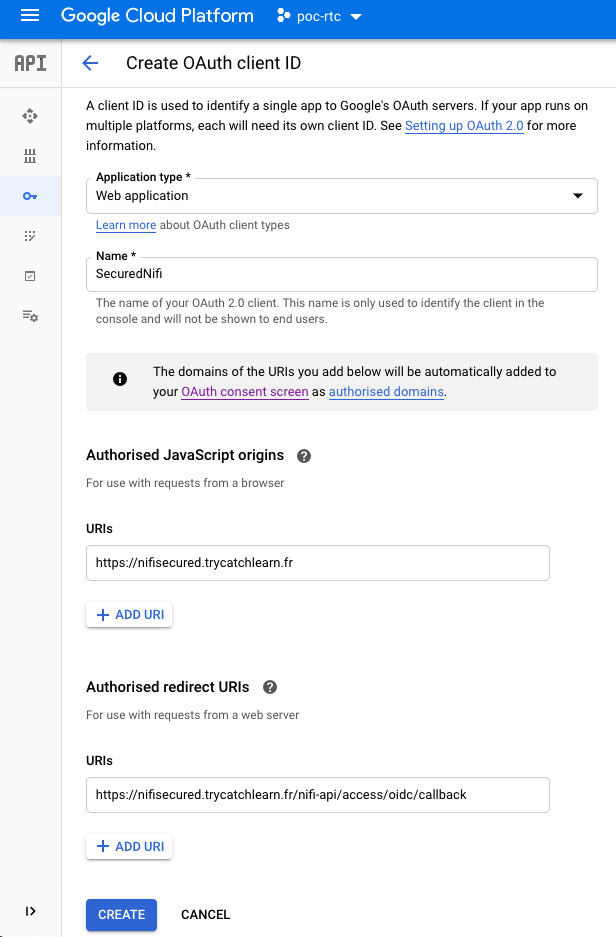
First step is to create the OAuth Credential :

  • Go to your GCP project, and in the left bar : APIs & Services > Credentials
  • Click on CREATE CREDENTIALS : OAuth client ID
  • Select Web Application
  • Give a name like SecuredNifi.
  • For Authorised JavaScript origins, use your own domain. I'm using : https://nifisecured.trycatchlearn.fr:8443
  • For Authorised redirect URIs it's your previous URI + /nifi-api/access/oidc/callback, for me : https://nifisecured.trycatchlearn.fr:8443/nifi-api/access/oidc/callback

OAuth credentials

  • Create the OAuth credentials

Once the credentials are created, you will get a client ID and a client secret that you will need in NifiCluster definition.

Create service account

For the GKE cluster deployment you need a service account with Editor role, and Kubernetes Engine Admin.

Deploy secured cluster

Once you have completed the above prerequisites, deploying you NiFi cluster will only take three steps and few minutes.

Open your Google Cloud Console in your GCP project and run :

git clone https://github.com/Orange-OpenSource/nifikop/nifikop.git
cd nifikop/docs/tutorials/secured_nifi_cluster_on_gcp

Deploy GKE cluster with Terraform

Deployment

You can configure variable before running the deployment in the file terraform/env/demo.tfvars :

  • project : GCP project ID
  • region : GCP region
  • zone : GCP zone
  • cluster_machines_types : defines the machine type for GKE cluster nodes
  • min_node : minimum number of nodes in the NodePool. Must be >=0 and <= max_node_count.
  • max_node : maximum number of nodes in the NodePool. Must be >= min_node_count.
  • initial_node_count : the number of nodes to create in this cluster's default node pool.
  • preemptible : true/false using preemptibles nodes.
  • nifikop_image_repo : NiFiKop's image repository
  • nifikop_image_tag : NiFiKop's image tag
  • nifikop_chart_version : NiFiKop's helm chart version
./start.sh <service account key's path>

This operation could take 15 minutes (time to the GKE cluster and its nodes to setup)

Once the deployment is ready load the GKE configuration :

gcloud container clusters get-credentials nifi-cluster --zone <configured gcp zone> --project <GCP project's id>

Explanations

The first step is to deploy a GKE cluster, with the required configuration, you can for example check the nodes configuration :

kubectl get nodes
NAME STATUS ROLES AGE VERSION
gke-nifi-cluster-tracking-ptf20200520-a1aec8fe-2dl3 Ready <none> 110m v1.15.9-gke.24
gke-nifi-cluster-tracking-ptf20200520-a1aec8fe-5bzb Ready <none> 110m v1.15.9-gke.24
gke-nifi-cluster-tracking-ptf20200520-a1aec8fe-5t3l Ready <none> 110m v1.15.9-gke.24
gke-nifi-cluster-tracking-ptf20200520-a1aec8fe-w86j Ready <none> 110m v1.15.9-gke.24

Once the cluster is deployed, we created all the required namespaces :

kubectl get namespaces
NAME STATUS AGE
cert-manager Active 106m
default Active 116m
kube-node-lease Active 116m
kube-public Active 116m
kube-system Active 116m
nifi Active 106m
zookeeper Active 106m

In the cert-manager namespace we deployed a cert-manager stack in a cluster-wide scope, which will be responsible for all the certificates generation.

note

in this post, we will let cert-manager create a self-signed CA. For more information check documentation page

kubectl -n cert-manager get pods
NAME READY STATUS RESTARTS AGE
cert-manager-55fff7f85f-74nf5 1/1 Running 0 72m
cert-manager-cainjector-54c4796c5d-mfbbx 1/1 Running 0 72m
cert-manager-webhook-77ccf5c8b4-m6ws4 1/1 Running 2 72m

It will also deploy the Zookeeper cluster based on the bitnami helm chart :

kubectl -n zookeeper get pods
NAME READY STATUS RESTARTS AGE
zookeeper-0 1/1 Running 0 74m
zookeeper-1 1/1 Running 0 74m
zookeeper-2 1/1 Running 0 74m

And finally it deploy the NiFiKop operator which is ready to create NiFi clusters :

kubectl -n nifi get pods
NAME READY STATUS RESTARTS AGE
nifikop-849fc8548f-ss6w4 1/1 Running 0 74m

Deploy Secured NiFi cluster

You will now deploy your secured cluster to do so edit the kubernetes/nifi/secured_nifi_cluster.yaml and set with your own values :

apiVersion: nifi.orange.com/v1alpha1
kind: NifiCluster
metadata:
name: securednificluster
namespace: nifi
spec:
...
initialAdminUser: <your google account email>
readOnlyConfig:
# NifiProperties configuration that will be applied to the node.
nifiProperties:
webProxyHosts:
- <nifi's hostname>:8443
# Additionnals nifi.properties configuration that will override the one produced based
# on template and configurations.
overrideConfigs: |
...
nifi.security.user.oidc.client.id=<oidc client's id>
nifi.security.user.oidc.client.secret=<oidc client's secret>
...
  • Spec.InitialAdminUser : Your GCP account email (this will give you the admin role into the NiFi cluster), in my case aguitton.ext@orange.com
  • Spec.ReadOnlyConfig.NifiProperties.WebProxyHosts[0] : The web hostname configured in the Oauth section, in my case nifisecured.trycatchlearn.fr
  • Spec.ReadOnlyConfig.NifiProperties.OverrideConfigs : you have to set the following properties :
    • nifi.security.user.oidc.client.id : OAuth Client ID
    • nifi.security.user.oidc.client.secret : OAuth Client secret

Once the configuration is ok, you can deploy the NifiCluster :

kubectl create -f kubernetes/nifi/secured_nifi_cluster.yaml

After 5 minutes your cluster should be running :

kubectl get pods -n nifi
NAME READY STATUS RESTARTS AGE
nifikop-849fc8548f-ss6w4 1/1 Running 0 28h
securednificluster-0-node9tqff 1/1 Running 0 5m52s
securednificluster-1-nodew9tsd 1/1 Running 0 6m30s
securednificluster-2-nodemlxs8 1/1 Running 0 6m28s
securednificluster-3-nodeckw8p 1/1 Running 0 6m26s
securednificluster-4-nodewzjt7 1/1 Running 0 6m24s

Access to your secured NiFi Cluster

To finish you have to get the public IP of the load balancer :

kubectl -n nifi get svc
NAME TYPE CLUSTER-IP EXTERNAL-IP PORT(S) AGE
securednificluster LoadBalancer 10.15.248.159 34.78.140.135 8443:30248/TCP,6007:30517/TCP,10000:31985/TCP 27m
securednificluster-headless ClusterIP None <none> 8443/TCP,6007/TCP,10000/TCP 27m

In my case it's 34.78.140.135.

We can now update the DNS records of your domains to add a DNS record of type A redirecting your hostname (in my case nifisecured.trycatchlearn.fr) to the load balancer IP.

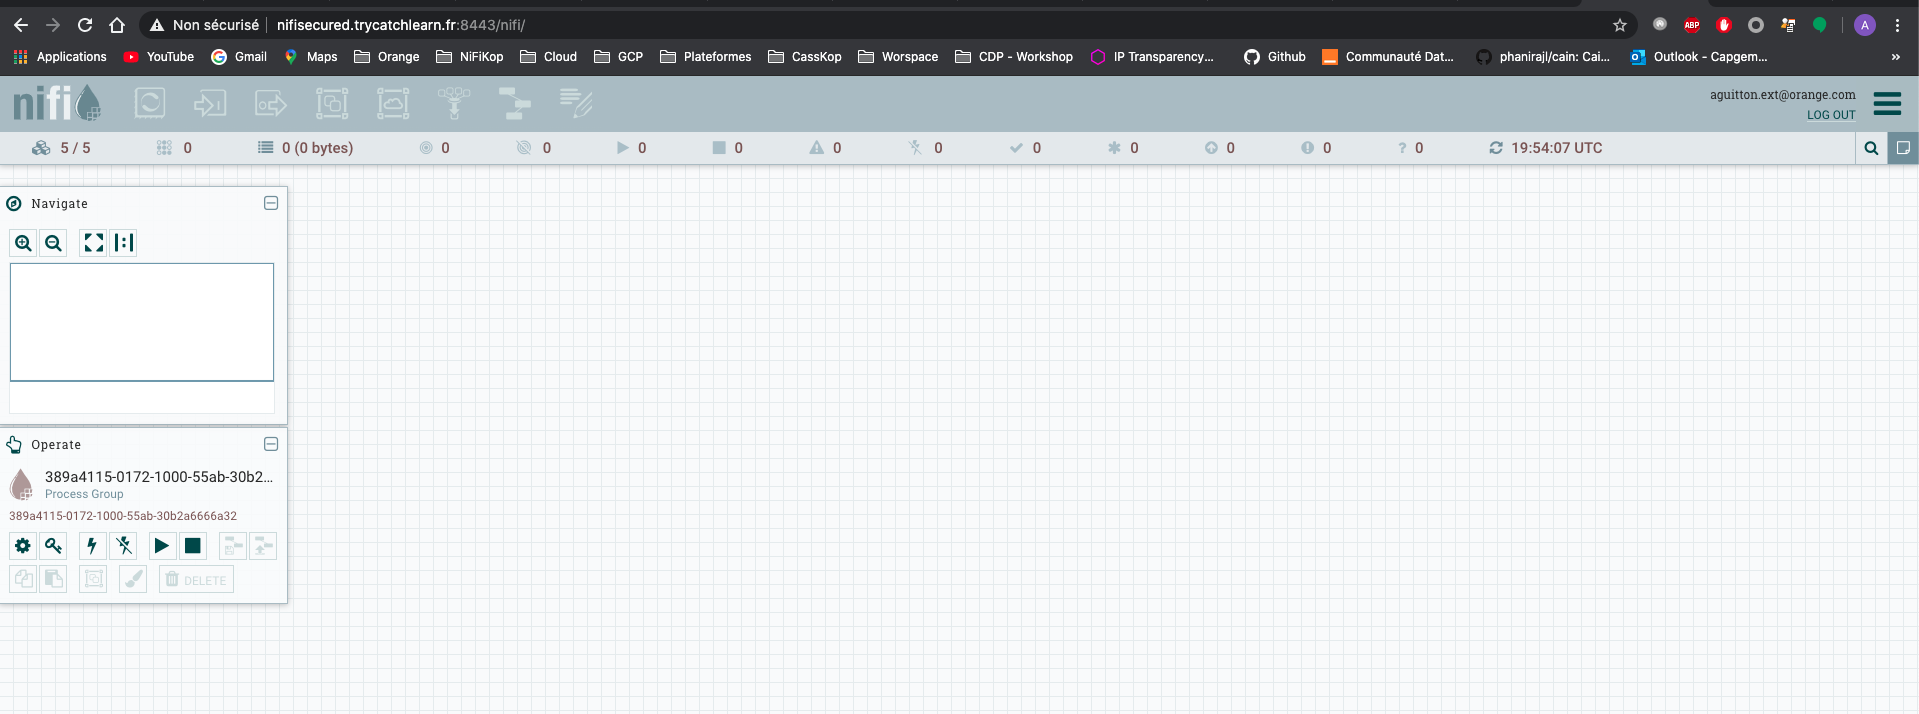
I can now access the NiFi cluster using https://nifisecured.trycatchlearn.fr:8443/nifi and authenticate on the cluster using the admin account email address I configured in the NifiCluster resource.

Here is my 5-nodes secured NiFi cluster up and running :

6 nodes cluster

5-nodes secured NiFi cluster :

5 nodes

You can now update the authorizations and add additionnal users/groups.

note

Just have a look on documentation's page to finish cleaning setup.

Cleaning

To destroy all resources you created, you just need to run :
kubectl delete nificlusters.nifi.orange.com securednificluster -n nifi
kubectl delete crds nificlusters.nifi.orange.com
kubectl delete crds nifiusers.nifi.orange.com
./destroy.sh <service account key's path>